Color
Input and display color spaces, channels, the grading panel, curves, hue ranges, scopes and LUTs.
Two color spaces, and why
The player needs two settings:
- the input space (Input Color Space) says what the file is: a 3D render is often linear, a photograph sRGB, a VFX asset ACEScg, a camera negative ARRI LogC4;
- the display space (Display Space) says what your screen is: sRGB on a computer monitor, Rec. 709 on a broadcast monitor.
The player converts from the first to the second. Getting either wrong makes a correct picture look broken.
Technical details How the input space is decided, and the list of spaces
How the input space is decided. First what the file says (camera RAW states its curve, a file can carry an OpenColorIO space name). Otherwise, the kind of file: EXR and HDR are taken as scene-linear, everything else as display-referred. Edit > Preferences... > Color sets those two defaults (Scene-linear sources and Everything else); for an ACES pipeline, set the first to Linear ACEScg. A space you pick by hand stays with the clip and is no longer re-detected.
| List | Choices |
|---|---|
| Input | Linear ACEScg, sRGB, ACES2065-1 (AP0), Adobe RGB, ProPhoto RGB, Linear sRGB / Rec.709, ARRI LogC3 (EI 800), ARRI LogC4 |
| Display | Linear ACEScg, sRGB, Rec. 709 (Gamma 2.4), DCI-P3 (Gamma 2.6), Rec. 2020 (SDR 2.4), Display P3, ACES 1.0 SDR (sRGB), ACES 2.0 SDR (sRGB) |
F2 sets the display to sRGB, F4 the input to sRGB, F5 the input to linear sRGB (Rec. 709).
Channels
C shows full color, R, G, B and A one channel in gray, Shift+L the luminance. In A/B the channel applies to both tracks; Alt+click a channel to change it on the active track only.
The color panel
The Inspector's Color & Image tab is the color panel: the whole grade in one column, in the order the picture goes through it. The same functions are in the Color menu.
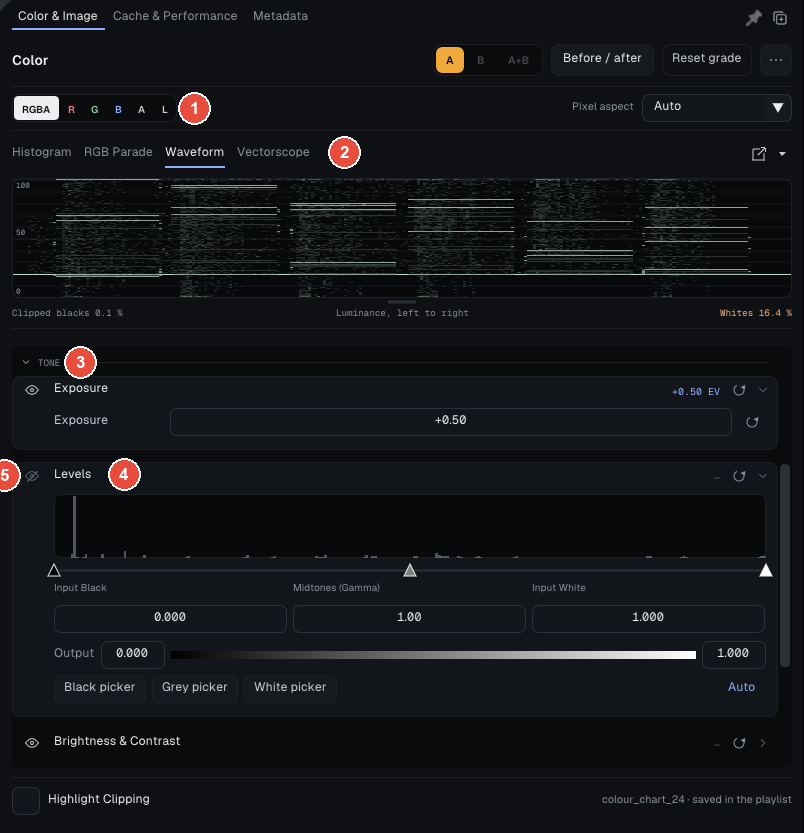
On the capture:
- 1 · The options row: A, B and A+B choose what you grade (A+B writes every change on both tracks). Before / After cuts the whole grade on screen without losing it; a Before: grade off badge says so. Reset Grade puts everything back (
Shift+Home). The ... button holds Copy Grade, Paste Grade and Presets. - 2 · The scopes, at the top (see below). The handle under them sets their height, the chevron folds them (folded, they compute nothing), Open in Window opens them in their own window.
- Color pipeline, above the groups (scrolled out of the capture): Input (the input space) and Output (the display space and the view LUT).
- 3 · The groups: Balance (white balance, offset, RGB gains), Tone (exposure, levels, brightness and contrast), Color (hue and saturation, hue ranges) and Curves and gamma. They apply in this order: input, balance, tone, color, curves, gamma, output.
- 4 · A stage opened, here Levels, with its histogram, its fields and its pickers. On the capture Tone shows Exposure at +0.50.
- 5 · The eye of each stage turns it off without losing its values (here Levels is off); a second click turns it back on. Each stage has its own reset.
On the keyboard: E enters exposure mode and Y gamma mode (drag, or use the wheel), Shift+B brightness, Shift+K contrast; Escape leaves the mode. In Levels, Black picker, Gray picker and White picker take a pixel of the picture as black, neutral gray or white; Auto sets black and white from the histogram.
The grade is saved with the playlist, follows into thumbnails and exports, and reaches the people in a review session. Save as Preset... keeps a named grade in your profile (the color_presets folder); Export Presets... and Import Presets... exchange them.
Curves and hue ranges
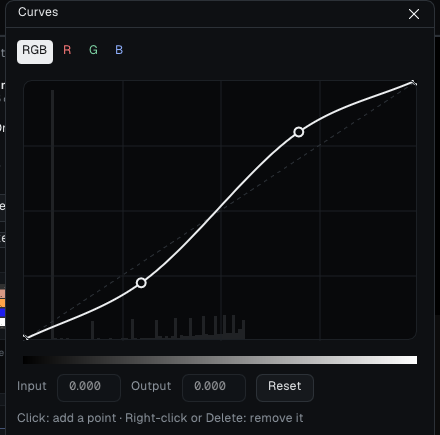
Color > Curves... opens the curves: RGB (the master), then R, G and B. The axis is ACEScct, the log encoding colorists grade in, so shadows, midtones and highlights each get their share of the curve. A click adds a point, a right-click or Delete removes it; 16 points at most. The curve never overshoots between two points, and an EXR's values above 1 are not clipped.
Color > Hue Ranges... sets hue, saturation and lightness by range: Reds, Yellows, Greens, Cyans, Blues, Magentas, plus a global Lightness. One range blends softly into the next: no edge in a gradient.
The scopes
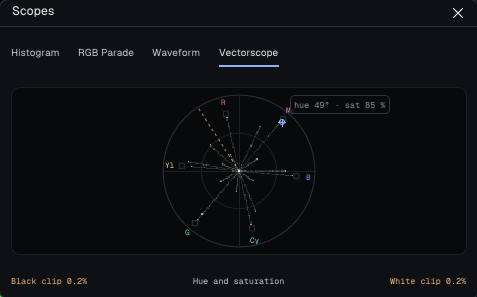
Color > Scopes (or Window > Scopes) measures the picture on screen, after the grade and the display transform, before anything drawn on top:
- Histogram: how many pixels sit at each level, in R, G, B and luma;
- RGB Parade: R, G and B side by side, 0 to 100 IRE;
- Waveform: the luma, left to right as in the picture;
- Vectorscope: hue and saturation around the center, with the 75% color-bar targets and the skin-tone line.
Black clip and White clip give the share of crushed or blown pixels. Hover a scope to read the value under the pointer; a click freezes it, a right-click offers Copy Value. Hover the picture: its pixel is marked in the scope. Closed, the scopes cost nothing.
LUTs and out-of-range values
- Load .cube LUT... loads a 3D LUT (
.cube); Enable 3D LUT, or Color > Display Transform (View LUT), turns it on or off. It applies last, after the display space. In A/B each track can carry its own. - Highlight Clipping paints solid red what goes above 1.0 and solid blue what goes below 0, after the grade.
If you grade a high-dynamic-range picture, keep the cache in half float: see Memory and performance.
Going further: the complete manual, part 4 (Help > User Guide).