Getting started
Install Bernard Review, open a sequence, play it, compare two versions and start a review with other people, in five steps.
Bernard Review plays the pictures of a film as your pipeline writes them: EXR, DPX, TIFF, PNG or JPEG sequences, MOV, MP4, MKV or MXF movies, camera RAW files and Flash animatics. Nothing has to be converted first. This page takes you from an empty window to a review other people can follow. Each step is covered in detail in the task guides.
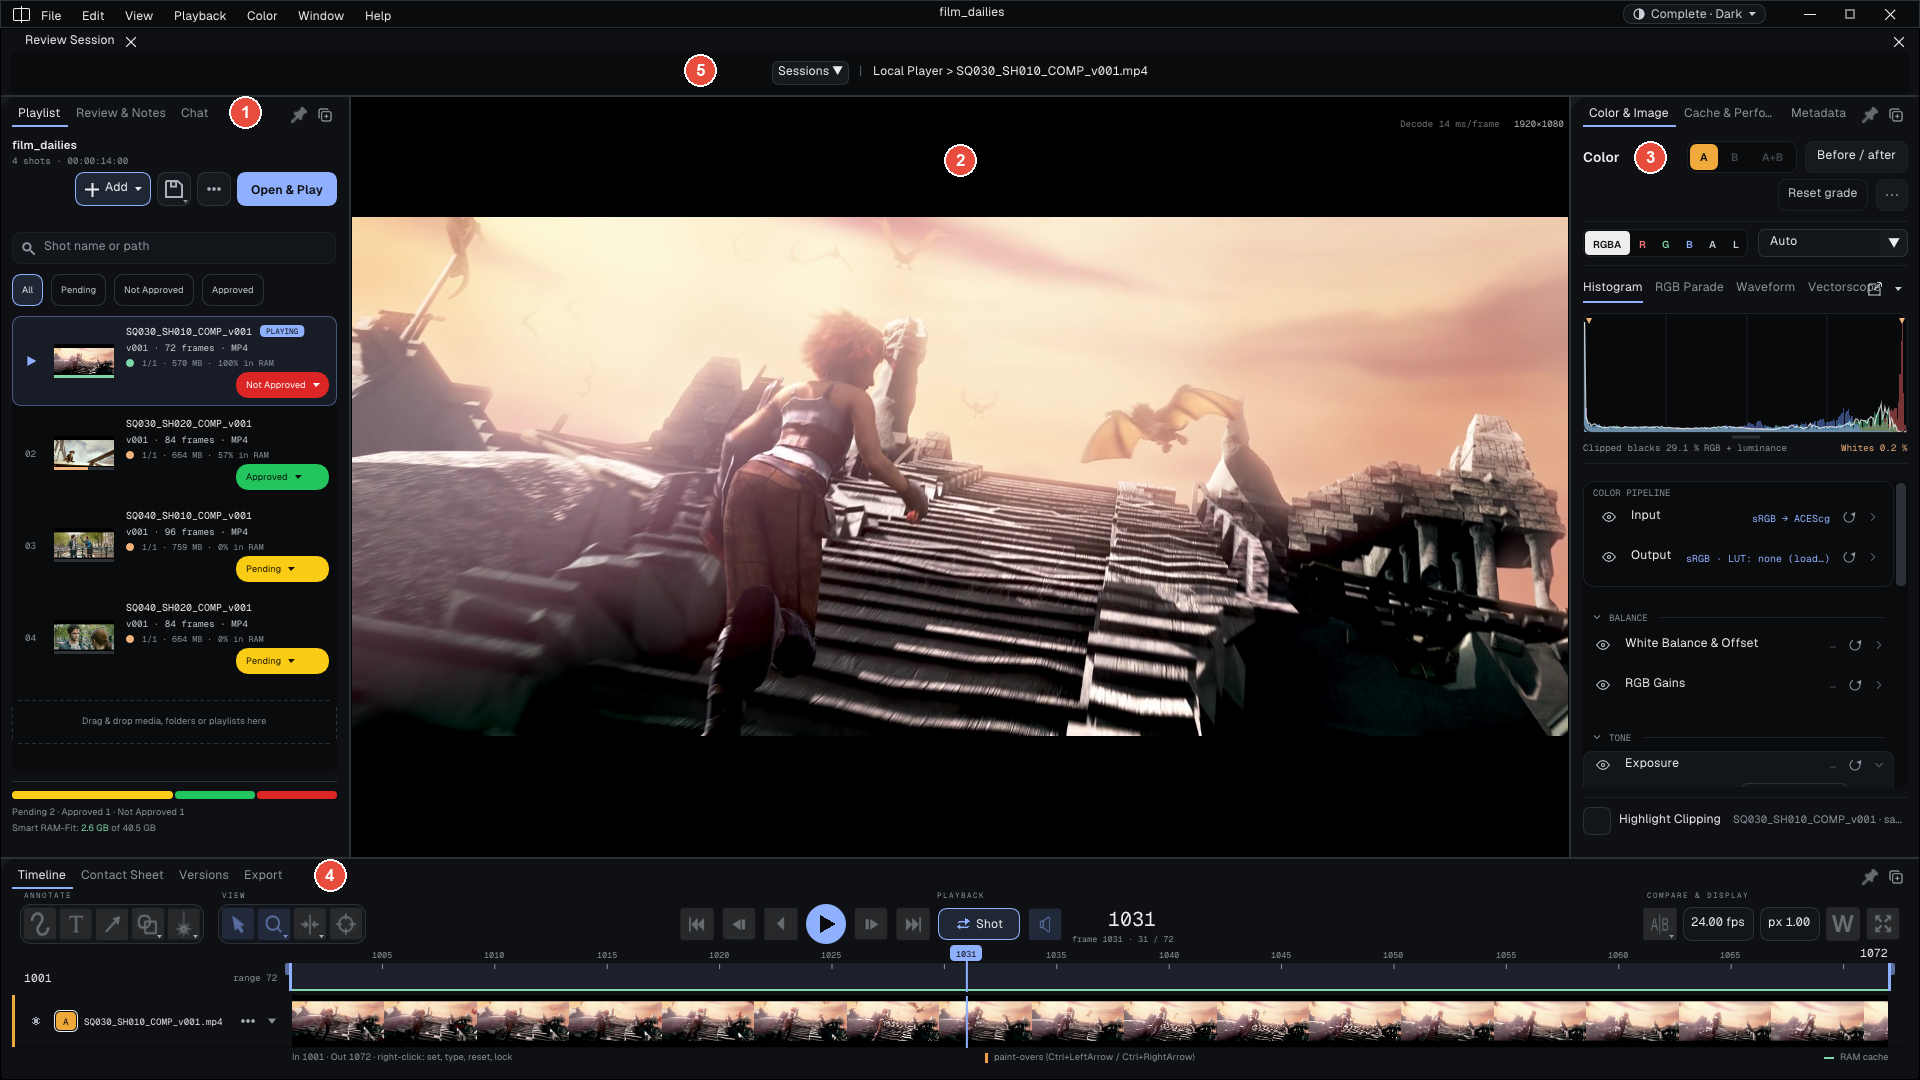
Images: Sintel and Tears of Steel, (CC) Blender Foundation | studio.blender.org
The window has five areas, numbered on the capture:
- Media & Session, on the left: the playlist, the notes (Review Notes) and the chat.
- The viewer, in the center: the picture.
- Inspector & Tools, on the right: color, cache and metadata.
- Timeline, at the bottom: the transport buttons, the frame ruler and the strip of thumbnails.
- Review Session, at the top: the bar for review sessions.
Every panel can be closed, reopened from the Window menu or torn off onto another screen.
The first launch
A new installation asks one question: I mostly review (the Essential interface, cut down to what a review needs) or I need all the tools (the Complete interface, with every panel). Two optional fields take your name and your e-mail: they are what the watermark prints and what review sessions show the others. Skip leaves the question unanswered and opens the Complete interface.
Changing the level changes no setting, no grade and no note. Switch with Ctrl+Shift+E, with Window > Essential and Window > Complete, or with the display button at the right of the menu bar (it reads, for example, Complete · Dark). The same button chooses the display mode: Dark (the default), Light, Neon or System, which follows your system's light or dark setting.
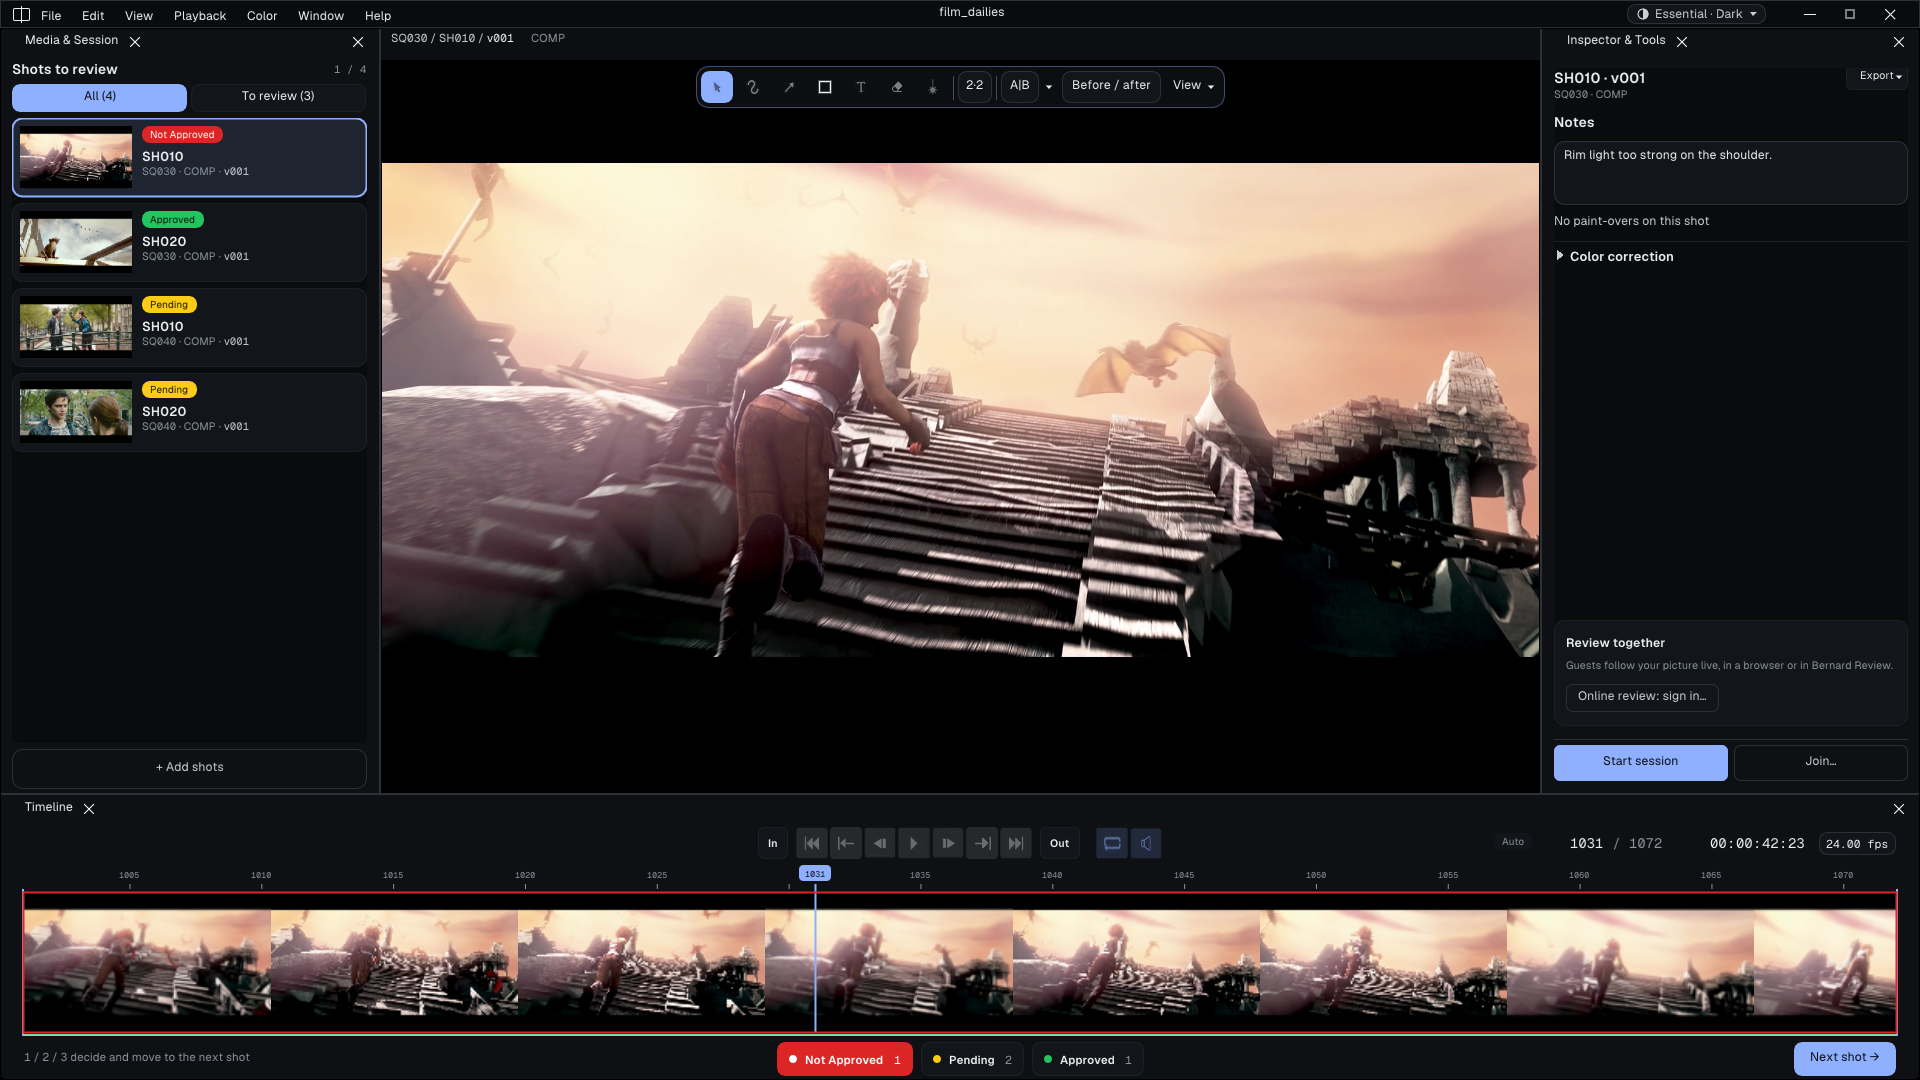
The Essential view
Images: Sintel and Tears of Steel, (CC) Blender Foundation | studio.blender.org
Essential keeps what a review needs, in four areas:
- Shots to review, on the left: one card per shot with its thumbnail, its status and its name; All or To review above the list, + Add Shots below it. A click shows the shot; drag a card to change the order.
Ctrl+click andShift+click pick several shots; a right-click gives one menu for the selection (Delete N shots, after a confirmation, Open N folders, Copy N paths, Set N shots to a status). - The paint bar, at the top of the viewer: the selection tool, the brush, the arrow, the shapes, text, the eraser and the laser, onion skinning, A|B (compare), Before / After and View (flips, rotation, zoom). With a drawing tool, its settings (color, size, opacity) show on a second row. Above it, a line names the shot on screen (sequence / shot / version).
- On the right: the shot's Notes (the field grows with the text, up to twelve lines) and its paint-overs, Color correction (folded), then Review together: Start Session, Join... and Online review: sign in.... A tracker pill and Publish (N) show here only when Bernard Engine or a tracker is connected.
- At the bottom: the timeline across the whole width, with In and Out, the transport, the frame counter,
Auto(the player chooses the decode resolution) and the frame rate. Under it the status row: Not Approved, Pending and Approved with their counts, and Next shot →.
Decide with 1, 2 and 3. In Essential and Complete the keys 1, 2 and 3 (on the main keyboard or the keypad) give the shot on screen Not Approved, Pending or Approved, then show the next shot. They do nothing while you type a note. When every shot has a decision, Next Shot becomes Finish Review: see Trackers.
The five steps
1. Install
Download the player for your system from the website's download page. It is free and needs no account. Windows has an .exe installer; Linux has an .rpm package and a .sh archive that installs without administrator rights. The details are in Installation and IT.
2. Open a sequence
Use File > Open File or Sequence... (Ctrl+O), or drag a file or a folder into the playlist on the left. For an image sequence, pick any one frame: the whole sequence loads as one clip. A dropped folder adds nothing straight away: the Import Directory window lists what it found, you untick what you do not want, then Import Selected.
3. Play
Space plays and pauses. The Left and Right arrows step one frame, ten with Shift. J, K and L play backwards, stop and play forwards. I and O set the in and out points, \ clears them.
4. Compare A and B
Press W. Drop the other version onto the B side of the picture, or double-click it to choose a file. Drag the divider to wipe from one to the other. Shift+1 shows A alone, Shift+2 B alone, Shift+3 brings the wipe back. See Compare.
5. Review together
In Complete, click Sessions ▼ in the Review Session bar, then Create New Session.... In Essential, click Start Session in the right-hand panel. Name the session, choose who can join, then click Start Session in the dialog. Invite, in the session bar, gives the way in: a link on the studio network or a VPN. To review with people outside the studio, Start Online Review... (in the same dialog) or Online review: sign in... (in Essential) starts an online review and gives a browser link. Everyone sees the same frame. Guests without the player follow in a web browser once Stream to Remote Guests is ticked in the session menu. See Review sessions.
Next: draw, write, save
Pshows the paint tools andShift+Wpicks the brush. The drawing belongs to the frame on screen.Escapeleaves paint mode.- Open the Review Notes tab of the left-hand panel and type your note in the clip's box. Your drawings appear under it as thumbnails, with their frame numbers.
- File > Save Playlist (
Ctrl+S) writes the clips, the notes, the drawings and the grade into one.bplfile, which you can reopen or send on.
Essential shortcuts
| Keys | Action |
|---|---|
Space | Play / pause |
J / K / L | Play backwards / stop / play forwards |
Left / Right | Previous / next frame |
Shift+Left / Shift+Right | Ten frames back / forward |
I or [ | Set the in point |
O or ] | Set the out point |
\ | Clear the in and out points |
F | Fit the picture to the window |
Alt+1 / Alt+2 / 4 | Zoom 100% / 50% / 25% |
1 / 2 / 3 | Not Approved / Pending / Approved, then the next shot (also buttons under the Playlist and Review Notes) |
Ctrl+O | Open a file or a sequence |
W | A/B compare |
Shift+1 / Shift+2 / Shift+3 | In A/B: A alone / B alone / the wipe |
E / Y | Exposure / gamma (drag or use the wheel; Escape to leave) |
P | Show or hide the paint tools |
Shift+W | Brush |
Ctrl+Z / Ctrl+Y | Undo / redo a drawing |
Ctrl+S | Save the playlist |
Ctrl+Shift+E | Essential / Complete interface |
Every shortcut can be changed in Edit > Keyboard Mapping. The menus show the keys as they are printed on your own keyboard: on a French AZERTY keyboard the brackets sit on other keys, but I and O work everywhere.
Going further
- The task guides: Play and navigate, Compare, Annotate, Notes and export, Review sessions, Color, Memory and performance, Trackers.
- The complete manual: Help > User Guide.